How to Build the Perfect Garage Workbench at Home?
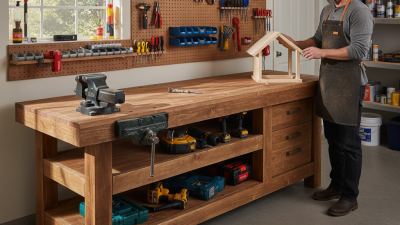
Creating the perfect garage workbench at home is essential for hobbyists and professionals alike. According to a recent report by the National Association of Professional Organizers, 78% of DIY enthusiasts believe a well-designed workspace boosts productivity. A garage workbench serves as the heart of these projects, providing both functionality and organization.
Expert carpenter John Smith emphasizes, "A garage workbench should fit your personal style and needs." His insights highlight the importance of customization. Selecting the right materials and configuration can greatly impact the efficiency of your workspace. However, many overlook the balance between functionality and aesthetics.
Building a garage workbench is not without its challenges. Space constraints and budget considerations often lead to compromises. It's crucial to reflect on your needs continuously to create an effective workspace. A well-planned garage workbench can enhance your projects while offering a space that inspires creativity.

Choosing the Right Location for Your Garage Workbench
Choosing the right location for your garage workbench is crucial for productivity and comfort. Ideally, the workbench should be placed in a well-lit area. Natural light is a big plus, as it helps reduce eye strain. If sunlight isn’t an option, invest in bright LED lights.
Consider the layout of your garage. The workbench should be easily accessible but not in the way of everyday activities. Avoid corners where space is limited.
Think about ventilation. A garage that is well-ventilated can help dissipate fumes and dust, especially if you’re doing projects with paint or chemicals. Make sure the area can handle the tools you’ll use. If you plan to work with larger equipment, ensure there’s enough clearance. Reflect on convenience too. The proximity to storage for tools and materials plays a significant role. It can be frustrating to walk across the garage repeatedly.
Visualize the workflow before you start designing the space. How often will you need to move materials? A poorly chosen location can lead to clutter and inefficiency. Pay attention to the safety aspects as well. Keep your workbench away from high-traffic areas to prevent accidents.
Ultimately, take your time to find the sweet spot for your garage workbench. A thoughtful layout can significantly improve your working experience.
Essential Tools and Materials for Building a Workbench
Building a perfect garage workbench begins with selecting the right tools and materials. The foundation of any workbench is its frame, which can be constructed from sturdy hardwood or plywood. According to a report by the Woodworking Industry Association, quality hardwood can increase durability by up to 30%. This longevity is vital for serious DIYers who rely on their workbench for various projects.
Essential tools include a circular saw, level, and drill. A well-calibrated circular saw ensures precision cuts. Inadequate tool calibration can lead to uneven surfaces. A study from the National Institute of Standards and Technology highlights that precise measurements reduce errors by 25%. Moreover, clamps are necessary for securing materials during assembly.
Materials such as a durable work surface or a softwood top allow for easy repairs. Plywood is often recommended for its affordability and resilience. However, it does require a protective finish to guard against spills and wear. Additionally, portable vices can enhance functionality but may add complexity to your setup. Balancing between functionality and simplicity is crucial. A workbench should ease your tasks, not complicate them.
Design Considerations: Size, Height, and Layout for Efficiency
When designing a garage workbench, size is vital. Consider the space available in your garage. A bench that is too large can become overwhelming, while a bench that is too small may not meet your needs. Aim for a surface area that comfortably accommodates your tools and projects. An ideal size is about six to eight feet long. This gives enough room for various tasks without crowding.
Height is also crucial for comfort and efficiency. Standard bench height is about 36 inches, but this can vary based on your height. A bench too high might strain your back, whereas one too low can lead to poor posture. Test different heights by standing next to various objects before deciding. Adjustability can enhance usability, allowing for a better fit for different tasks.
Layout plays a major role in efficiency. Keep your most-used tools within arm's reach. Consider vertical storage solutions for smaller tools. This maximizes workspace and minimizes clutter. A well-organized bench can boost productivity, but it’s essential to periodically reevaluate your setup. What works today might not suit future projects. Don't hesitate to adapt your layout as you develop new skills and take on varying tasks.
Step-by-Step Construction Process for Your Workbench
Building a perfect garage workbench requires careful planning and execution. Start by determining the bench dimensions based on your available space and intended use. Industry reports indicate that a standard height of 34 to 36 inches works well for most users. The ideal depth should be around 24 to 30 inches, allowing for ample workspace without obstructing movement.
When selecting materials, consider sturdy plywood or hardwood. A well-constructed workbench typically holds up to 500 pounds, according to professional woodworking studies. Use screws and strong wood joints for durability. Don’t forget about storage; adding shelves or drawers can enhance organization while keeping your tools handy.
**Tip**: Measure twice before cutting. Mistakes can lead to wasted materials.
Consider the surface finish. A smooth top can be beneficial, but it may also scratch easily. Reflect on what tasks you'll perform. You might want a surface that tolerates more wear. Add a vice for clamping if your projects require precision.
**Tip**: Use non-slip mats on the floor underneath to prevent accidents.
Incorporate lighting. A well-lit workspace improves visibility and safety. Mount LED lights on the ceiling or walls for optimal illumination. Always acknowledge that perfect doesn’t mean flawless; customization can lead to unexpected challenges. Adapting during construction might yield better usability in the long run.
How to Build the Perfect Garage Workbench at Home? - Step-by-Step Construction Process for Your Workbench
| Step |
Description |
Materials Needed |
Estimated Time |
| 1 |
Choose a Location |
N/A |
1 Hour |
| 2 |
Gather Tools |
Screwdriver, Saw, Hammer |
30 Minutes |
| 3 |
Cut the Wood |
Plywood, 2x4 Lumber |
2 Hours |
| 4 |
Assemble the Frame |
Nails, Screws |
1 Hour |
| 5 |
Attach the Surface |
Plywood, Screws |
1 Hour |
| 6 |
Finish and Paint |
Paint, Sandpaper |
2 Hours |
Adding Functional Features: Storage and Accessories for Your Workbench
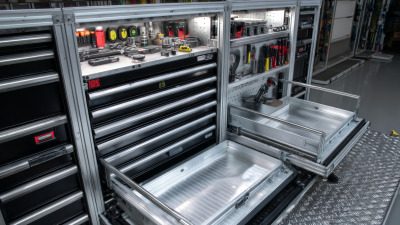
Creating a garage workbench involves more than just wood and tools. Storage solutions are crucial for keeping your workspace organized. Drawers under the work surface can hold small parts like screws, washers, and tape. Shelving units above the bench can store larger tools. Using clear bins helps you see what's inside. Consider labeling everything for quick access.
Accessories enhance your workbench's functionality. A mounted power strip makes plugging in tools easy. A magnetic strip for holding metal objects helps keep the workspace tidy. Installing a vice can significantly improve your work efficiency. However, what may seem like the perfect setup could also become cluttered quickly. Regularly reassess your layout and storage options.
Evaluate what you frequently use and keep those items close. Less-used tools can be stored further away. This balance between accessibility and organization is essential. Sometimes, what works initially may need adjustments as your projects evolve. Embrace the imperfections and actively seek ways to improve your setup.